
Date: Aug 21, 2015
By: Waleed Dallal (Waleed@bostonIT.com)
How to: When upgrading older versions of Microsoft Office to Office 2013, you would like to force Outlook 2013 to use same OST file and not create a new one:
Scenario:
- If you have your email hosted with an external Exchange server/service like Office 365 and you have slow Internet link
- If you are upgrading Outlook to 2013 on multiple computers.
- When you open up Outlook 2013 for the first time, Outlook will create a new OST and that will need to re-sync all mail data to the new OST file for Offline access. This might saturate your Internet link.
Resolution:
To prevent Outlook from creating a new OST file, and in order to force it to use the existing OST file:
- Method 1: Domain Group Policy. You can find instructions on the web on how to do that. We are here to create hands-on Knowledge-base articles where it's hard to find them anywhere else!
- Method 2: After you upgrade 2013, open up MS Word or Excel, and activate Office. Before you open up Outlook, add a new REG_DWORD called donotcreatenewostonupgrade and change it to 1. If OST key doesn't exist create it.
[HKEY_CURRENT_USER\Software\Microsoft\Office\15.0\Outlook\OST] "donotcreatenewostonupgrade"=dword:00000001
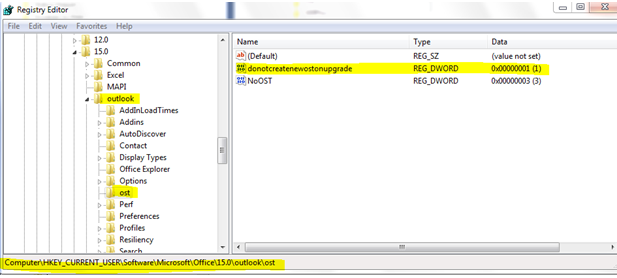
After creating that registry key, open up Outlook.
If you open up Outlook before creating that registry key, Outlook will create the new OST file which we don't want to happen.
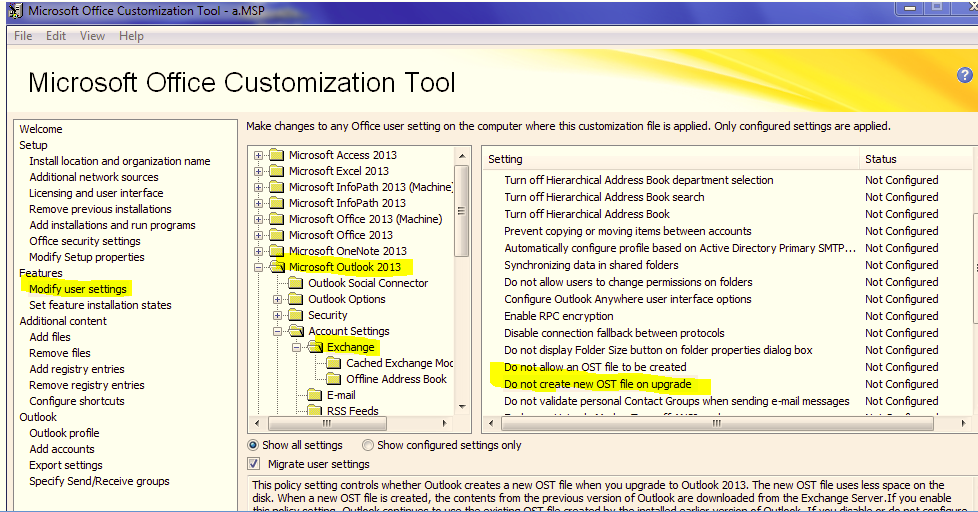
- Method 3: Alternatively, and this is what I would do, you can use Microsoft Office Customization Tool (OCT) to create an MSP file that creates that registry key when you do the upgrade, and you can include other settings like incorporating the Office 2013 key so you don't have to enter it every time you need to upgrade a client.
Here how you do that:
Copy Office 2013 volume media into a network drive
Go to command line, change dir to that network drive, and type
setup.exe /admin
The OCT Window will launch, change "Do not create new OST file on upgrade" to configured/enabled.
Save the MSP to the same network drive, let's say k:\Outlookupgrade.MSP
Now on workstations, go to command line, change dir to the network drive and run the following:
k:\setup.exe /adminfile \\ServersName\ShareName\Outlookupgrade.msp
The path for the MSP in the command line above must be the full network path \\ServersName\ShareName\Outlookupgrade.msp. It can't be a mapped drive (for some reason if you use a mapped drive, setup will not work - never worked for me). You can continue to with the install wizard of MS Office 2013 and that registry setting will be automatically created. Once you open up Outlook after the upgrade, Outlook will use existing OST file. Mission Accomplished!
If you find this article helpful, please click to like our Facebook page below so we can keep on adding quality hands-on articles.